 ArcDist
-Redactive archive distribution utility for Avid iNEWS
ArcDist -Redactive archive distribution utility for Avid iNEWS
·
Pentium 1, 233 Mhz or better
·
64 Megabytes of RAM
·
CDRom Drive
·
8 Megabytes available disk space for the application
·
Sufficient available disk space for the data
Archive
conversions are delivered to the customer as a single file – regardless of
whether they are HTML conversions for the NRCS Web Archive, or an NSML
conversion for installing directly into the NRCS file system (see Archive Types
later). Both of these formats
actually require that each individual record be a single file on the host
system. With most archive conversions
consisting of as many as 1 to 1.5 million records – converting and moving these
files around becomes an almost impossible task.
Instead
of creating the individual files the iNews conversion concatenates all of them
(either HTML or NSML) into a single large file. This file can be extremely large (1 to 2 gigabytes is not
entirely unusual). A special, and
unique, delimiter is placed in between each record in the file.
In
addition to the delimiter each file is also marked with a date (provided the
date is known) in the format of YYYYMM (Year Year Year Year, Month Month). ArcDist will then distribute each HTML
record into a subdirectory structure on the host system as follows:
YYYY--
|_ MM
|_
MM
YYYY--
|_
MM
NSML
files are distributed directly into the NRCS system (via FTP) into a similar
queue structure.
Archives
can be converted into HTML or NSML files.
HTML is for the Web Archive only and requires an NT server running
Microsoft Indexing Service (formerly known as IIS).
NSML
files are a proprietary data structure used by the iNEWS NRCS system for
storage directly into a queue (or series of queues). Customers may select either type of archive conversion
(typically not both however).
ArcDist
is included on the archive conversion CD the customer receives. Install it by running the SETUP.EXE located
on the CD sent to you with your converted archive. ArcDist can be installed on Windows 9X, NT and Windows 2000
systems. Installing on most 9X systems
requires a reboot during the installation process. This is required to remain compatible with new Windows
installer technologies supported under Windows ME and Windows 2000.
It
will take a very short time to install ArcDist. By default the program will be installed in the Program Files
directory under a newly created folder called iNEWS.
Important: You may install ArcDist anywhere – but you must install it onto a drive with sufficient space to hold the archive file in it’s uncompressed form. Typically you should count on having about 2 Gigabytes free – so make sure you install ArcDist on a drive with about 2 gigabytes of free space.
Installing
ArcDist will require about 8 megabytes of available disk space.
One
the archive files have been correctly distributed onto the host system the
entire ArcDist program may be removed from the computer. Remove the program by going to the Add/Remove
Programs
in the Windows
Control Panel. Please do not
just delete the ArcDist executable file as this will result in only a very
small amount of disk space saved – and not remove most of the now unnecessary
support files placed onto the system.
Although ArcDist consists of only one executable file – there are many
other support files that are installed into the Windows and Windows\System
directories to enable the functions in ArcDist. Properly removing the application will also remove these support
files and result in a cleaner removal and significant disk space savings
(approx. 6 megabytes).
HTML Files will be distributed onto your host system – each story from the archive will become a separate file on your host system once it has been distributed. In some cases several stories may be concatenated into a single file – this usually results from older archive formats (ADP and Librarian) that “bundled” stories together to save space on old DOS systems.
You must distribute the files onto your NT or Windows 2000 server that is running the Microsoft Indexing Service (Formerly IIS). You must make sure there is sufficient space on the server to store all of the files that will be distributed. Typically a couple of gigabytes is sufficient. All of the files will be distributed in a structure of Year and Month. The year and month is derived from date information from within each story – and may or may not represent the actual date of the story.
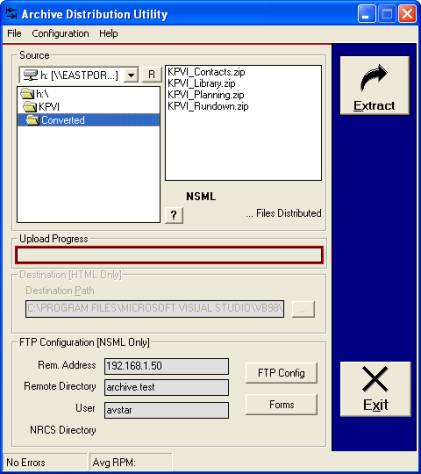
Step 1: The CD
contains a data file(s) that end in either .zip
or .CPT. This file can be
distributed to the host system directly from the CD. From the Source area navigate to the CDROM drive and locate the .zip or .CPT file(s). The file will show up in the box on the
right-hand side of the Source area.
Step 2: For HTML
output set the destination on the Host system in the Destination area. You may navigate to, or create the
appropriate location using the browse “…” button.
To
select a host location on the network make sure you have access to a writable
share then map a drive to that share.
Once you assign a drive to the share it will show up in the navigation
dialog under the “…” button.
Step 3: Start the
distribution by pressing the Extract button.
If you were sent a .zip file
it will be extracted to a folder called “Expanded Data”. This will be a sub-folder of the
installation directory of ArcDist.
Once the extraction has completed (this will take several minutes – depending
on how large the compressed file is) a .CPT file will
show up in the Source area. The CPT file is the
uncompressed file containing all of the HTML files to be distributed. The distribution process will automatically
begin.
For NSML
Distribution
NSML
Files will be distributed directly into your NRCS system. You will first have to make a folder on
your NRCS system to receive the files.
There are two ways to create all of the subfolders and queues with the
ArcDist program – one is automatic and one is manual. Unfortunately the automatic method is only available in NRCS
version 1.4 and above. All previous
version must be done manually. In
either case you must make the host folder manually. Typically you should create a directory called ARCHIVE.
Versions
below 1.4
Before
distributing the stories into your NRCS system you must create all of the YEAR
folders and the MONTH queues beforehand.
For each year you know of in the archive you must create a YEAR folder
from the ARCHIVE folder:
ARCHIVE
|_1997
|_1998
|_1999
Below
each YEAR you must create all 12 months as the short abbreviation (in English
this is JAN, FEB, MAR, etc…)
ARCHIVE
|_1997
|_JAN
|_FEB
|_MAR
|_APR
|_MAY
|_JUN
|_JUL
|_AUG
|_SEP
|_OCT
|_NOV
|_DEC
Remember –
the ARCHIVE and YEAR are Folders
while the MONTHS are Queues! In NRCS Folders can not hold stories.
You
must do this for every year.
All
you need to do in 1.4 and above is make sure the ARCHIVE folder has been
created – and then check the RXNet Support MkDir configuration option in the FTP Configure.
Reordering
Automatically Created 1.4 Folders & Queues
Because
the automatic upload of archives in 1.4 can result in an odd order of years and
months you may wish to reorder them to make more visual sense. Version 1.4 of NRCS has a new Unix reorder
command available. Your system manager
should be consulted before attempting the reorder command for folders and
queues on your server(s). If you are
unfamiliar with Unix commands you may also wish to contact iNEWS customer
service.
The
reorder command syntax from the console is:
?: version reorder
reorder: 1.2.4.5 SCO
?:
reorder ?
usage: reorder
<parent>
<child> <position>
<position> can be:
-a <sibling> (place <child> after
<sibling>)
-b <sibling> (place <child> before
<sibling>)
-<number> (move
<child> up <number> positions)
+<number> (move
<child> down <number> positions)
<number> (place
<child> at <number> position)
?:
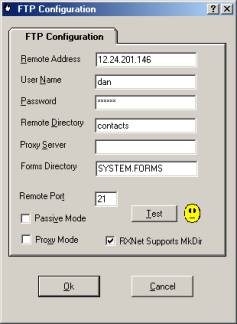
Configure the FTP Settings
You
must have RXNet configured and running on your NRCS system. Next you need to configure the FTP Settings
on ArcDist.
Remote
Address:
enter the IP address of the RXNet. If
you do not know the IP Address of your main iNEWS server you can discover it by
going to a command prompt on any client PC and entering:
PING
[your main server name]
User Name: Enter a user
name (someone who has write access to the queue you will be placing the scripts
into)
Password: Enter their
password (it is saved in the registry – but encrypted)
Remote
Directory: Enter the Folder (separate folders with a single period or
full stop)
Proxy Server: Probably not necessary to enter anything.
Forms
Directory: This is the directory where your forms are located.
Typically it is SYSTEM.FORMS unless you have translated your iNEWS systems to a
language other than English.
Remote Port: Leave at 21
RXNet
Supports MkDir: Set this only
if you have NRCS Version 1.4 or above
Save
these settings.
Important!
On a 1.3 or earlier version of NRCS you will need to create the YEAR and MONTH folders and queues before you FTP the archives into your system. We recommend you create a master archive folder called ARCHIVE. Underneath ARCHIVE create folders for each year represented by your archive, followed by queues for each month. The months must be the short designator defined by your locale – for example in US English they are: JAN, FEB, MAR, APR, MAY, JUN, JUL, AUG, SEP, OCT, NOV, DEC. During the FTP process if a MONTH or YEAR queue is missing an error message will pop-up and tell you to go to you NRCS system and create it. When you press OK it will continue.
Step 1: The CD
contains data file(s) that ends in .zip
or .cpt. The file(s) can be
distributed directly from the CD. From
the Source area navigate to the CDROM drive and locate the .zip or .cpt file(s).
Step 2: Start the
distribution by pressing the Extract button.
If you were sent a .zip file
it will be extracted to a folder called “Expanded Data”. This will be a sub-folder of the
installation directory of ArcDist.
Once the extraction has completed (this will take several minutes – depending
on how large the compressed file is) a .CPT file will
show up in the Source area. The CPT file is the
uncompressed file containing all of the NSML files to be distributed. The distribution process will automatically
begin. It may take many hours to
complete. If it attempts to place
files into a queue that does not exists (on version 1.3 and earlier) it will
stop with an error message. Make the
queue and continue.
Recovering
from a failed upload session
If
you have to stop an upload that is not yet complete you may want to either:
A.
Try the recovery method
B.
Start again
If
you start again you will need to delete all of the files that have already been
uploaded onto your NRCS system.
Recover
mode keeps track of the last known record that was successfully uploaded to
your NRCS system or distributed to your HTML Web Archive.
If
you need to recover from a failure, or manually stopped upload or distribution
you can do so by selecting the Enable Recovery Mode menu option under CONFIGURATION.

Normally if your computer stops unexpectedly ArcDist will
know the next time you start it. It
will ask you if you want to attempt to recover from the point it left off. Otherwise you can access the recovery mode
manually through the menu option shown above.
Normally recovery is only usefull for uploads that fail well
into a large number of records. If
your upload of NRCS stories or distribution of HTML stories failed at a number
below 1000 – it is probably best to delete them from the receiving system and
start again.
NOTE: If you
have deleted any files (.cpt or .zip) from the source directory a recovery
attempt may fail!
The ArcDist utility can also upload contact lists to your
iNEWS system. If you have been
provided a conversion of your contact list, follow these instructions.
Forms
A special Contact List Form is provided that you can install
on your iNEWS system with ArcDist. It
is best to do this before uploading your converted contact list. The form will display information as
illustrated in the following graphic:

To upload this form you must first have iNEWS version 1.4 or
newer. Under FTP configuration make
sure you have set the Forms Directory to your forms directory (typically this
is SYSTEM.FORMS unless you have translated your system to a language other than
English). Also, make sure the RXNET
supports MKDir box.
Once the FTP configuration is complete you can upload the
form by clicking on the FORM button on ArcDist. This will connect to the iNEWS server and then show you a list
of forms that can be uploaded.
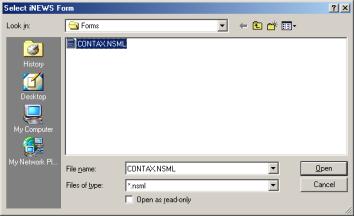
Select the form you want to upload to iNEWS and click
Open. This will automatically place
the form into the proper alphabetical index inside your SYSTEM.FORMS Folder.
Setting the Folder Properties
Before uploading the contact list to your system you will
need to create a folder where you wish to place the list. For example you may create a new folder
called CONTACTS.
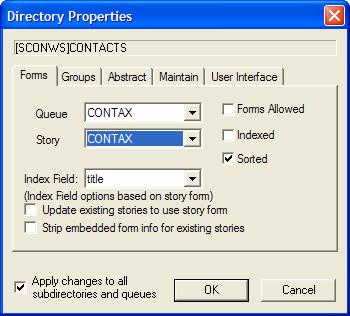
You must now assign the form to this folder so the data will
display properly. The easiest way t do
this is from the client. Right-Click
on the folder and select PROPERTIES. From here you can assign the form “CONTAX” to the folder (and all
sub-folders/queues). It is best to
assign the form to both the Queue and Story. It is also best to select the Sorted box and the Apply
changes to all subdirectories and queues box.
It
is best to assign these properties to the Contacts folder before uploading your
converted contacts to iNEWS.
Contact List
Structure
All
Contact Lists are placed on iNEWS in alphabetical folders. Contacts beginning with A are placed in an A
folder, etc. It is important to
remember that the quality of the converted data is highly dependant upon the
discipline in which the original data was entered. If first names and last names were originally entered in a mixed
fashion (e.g. sometimes first name, last name and sometimes last name, first
name) than the alphabetical order will reflect this. So Brown, John will be listed under the B’s while John Brown
would be listed under the J’s.